ArgoCD: The first step towards GitOps
A core component of GitOps is enforcing the deployment of apps using Git. This means defining the app version and configuration you want in a Git repo, and using a tool like ArgoCD to sync the Git configuration to the deployment. In this article, we’ll look at how we can use ArgoCD to manage automatic Git based deployments of apps.
We start by creating and configuring a Kubernetes cluster, installing ArgoCD on it and then proceeding to use ArgoCD to deploy a sample app. Here’s the overview:

Create a Kubernetes cluster
To an extent, it is the abstraction provided by Kubernetes that largely enables the possibility of having infrastructure as code. Paired with Terraform, we get a powerful way of being able to create and manipulate infrastructure and apps in the form of code.
The easiest solution to set up to set up a homelab would be to use Minikube. There are also other ways of creating a cluster like K3S for or just a plain old cluster on any cloud provider. In this tutorial, we assume that the cluster is created using K3S.
After creating the cluster, make a new Git repo which will be our GitOps repo. Create a provider.tf file which would contain the credentials of the cluster
provider "kubectl" {
  host               = "https://192.168.1.1:6443"
  load_config_file   = false
  insecure           = "true"
  client_certificate = base64decode(var.kube_client_cert)
  client_key         = base64decode(var.kube_client_key)
}
This should now give Terraform access to our Kubernetes cluster. Test it by running terraform init
Setup ArgoCD
We can now start creating ArgoCD Terraform templates in a modular way, as is Terraform best practice.
Create a directory argo-cd inside of a modules directory. Let’s create a file argo-cd.tf with the following contents
resource "kubernetes_namespace" "argo-cd" {
  metadata {
    name = "argo-cd"
  }
}resource "helm_release" "argo-cd" {
  name       = "argo-cd"
  namespace  = "argo-cd"
  repository = "https://argoproj.github.io/argo-helm"
  chart      = "argo-cd"
  version    = "5.6.0"  values = [templatefile("${path.module}/values.yaml",{})]  depends_on = [
    resource.kubernetes_namespace.argo-cd
  ]
}
We are first create a namespace and then use the helm_release provider to install the argo-cd Helm chart along with a custom values.yaml file, the contents of which should be as follows:
controller:
  enableStatefulSet: trueserver:
  autoscaling:
    enabled: true
    minReplicas: 2repoServer:
  autoscaling:
    enabled: true
    minReplicas: 2configs:
  secret:
    argocdServerAdminPassword: $2a$10$6Oa1o/Y/5xjDk2dQCQ8F9uDCqm9w8BJEp7ZjI0.SvmZqIXXpHFyQW
The argocdServerAdminPassword is optional but makes it easy to access ArgoCD since otherwise you’ll have to fetch the initial admin secret from the cluster every time you recreate the deployment. It is a hashed value which can be generated using: htpasswd -nbBC 10 "" $ARGO_PWD | tr -d ':\n' | sed 's/$2y/$2a/'
With this we are ready to install Argo-CD! Run terraform apply to install it.
Try deleting and creating using Terraform. When it works a couple of times, you have achieved what is called a state of “reproducibility”. This will help us out in the future when the infrastructure becomes more and more complex, yet we stick to the principle of having almost all configuration as infra-as-code.
But even with infra-as-code, there are certain parameters and flows that might not lead to perfect reproducibility of your setup, and that’s where creating/recreating can also be a debugging process where you iron out the clinks in the armor. When you are able to reproduce your cluster setup from scratch, you can mark that as a checkpoint where the principles of GitOps are fully being followed.
Prepare Podinfo
Now with ArgoCD up and running, we can deploy our very first app. To keep things simple, let’s use the wonderfully well designed podinfo app.
In order to install this using ArgoCD, we first need to add the Helm repo URL of the app in ArgoCD.
Inside argocd/values.yaml add the following block
configs:
  repositories:
    podinfo-helm-repo:
      url: https://stefanprodan.github.io/podinfo
      name: podinfo
      type: helm
and then run terraform apply
This will add a repository inside ArgoCD and specifically the repository where the Podinfo Helm charts are available. Now that we have the source repository to pull the chart from, we just need to define the version we want to run. Where do we define this version? Inside App manifests
One approach to Gitops is to put “app manifests” inside a repo independent of application code. So simply create a new Git repo and give it a relevant name like “argocd-apps” or “app-manifests”.
Inside this repo, create a directory podinfo with the file release.yaml consisting of the following:
apiVersion: argoproj.io/v1alpha1
kind: Application
metadata:
  name: podinfo
  namespace: argo-cd
  finalizers:
  - resources-finalizer.argocd.argoproj.io
spec:
  destination:
    namespace: default
    server: 'https://kubernetes.default.svc'
  syncPolicy:
    automated:
      selfHeal: true
    syncOptions:
    - CreateNamespace=true
  project: default
  source:
    targetRevision: '>=5.*.*'
    repoURL: 'https://stefanprodan.github.io/podinfo'
    chart: podinfo
    helm:
      values: |
        replicaCount: '2'
This is telling ArgoCD to create an object on the cluster and specifies the Helm Chart, number of replicas, chart version etc. ArgoCD reads this file and then creates a “podinfo” Application by pulling the Helm Chart from the repoURL and then installing it on the cluster.
Whenever you make changes to this file, for example increasing the replicaCount from 2 to 3, ArgoCD will automatically update the Helm deployment and increase the number of Pods on the cluster to reflect these changes.
Create ArgoCD App-of-Apps
Instead of deploying the Podinfo app directly as we did above, it’s a better practice to use a pattern called app-of-apps that ArgoCD supports. This basically means that we only create a single ArgoCD App, which then recursively creates other apps that are defined in the app-manifest repo by going through all the directories. This makes it easier to manage syncing of several apps.
Our App-of-Apps will also live inside the app-manifests repo, so we need to add it to ArgoCD just like we did for the Helm repo. So under config.repositories, add another block for your Git app-manifests repo
app-manifests-repo:
  url: https://github.com/slashr/app-manifests.git
  name: app-manifests
  type: git
You should now see the Helm and Git repositories successfully added in ArgoCD Settings — Repositories page!

Now, let's create what ArgoCD calls an “app-of-apps” to deploy Podinfo on our cluster. ArgoCD provides ArgoCD Apps to create this pattern. So let’s install the chart and write a small config for it to deploy apps inside our app-manifests repo. Inside our argo-cd.tf file, we can add another helm_release resource block as follows:
resource "helm_release" "argo-cd-apps" {
  name       = "argo-cd-apps"
  namespace  = "argo-cd"
  repository = "https://argoproj.github.io/argo-helm"
  chart      = "argocd-apps"
  version    = "0.0.3"values = [templatefile("${path.module}/argo-cd-apps-values.yaml",{})]depends_on = [
    resource.kubernetes_namespace.argo-cd
  ]
}
We then create an argo-cd-apps-values.yaml file to specify the app-manifests repo where it will get the apps configuration from.
applications:
  - name: app-of-apps
    namespace: argo-cd
    project: default
    source:
      repoURL: https://github.com/slashr/app-manifests.git
      targetRevision: "main"
      path: "."
      directory:
        recurse: true
    destination:
      server: https://kubernetes.default.svc
      namespace: default
    syncPolicy:
      automated:
        prune: true
        selfHeal: true
The recurse: true option will look recursively inside the app-manifests repo and then create a corresponding app for each manifest found.
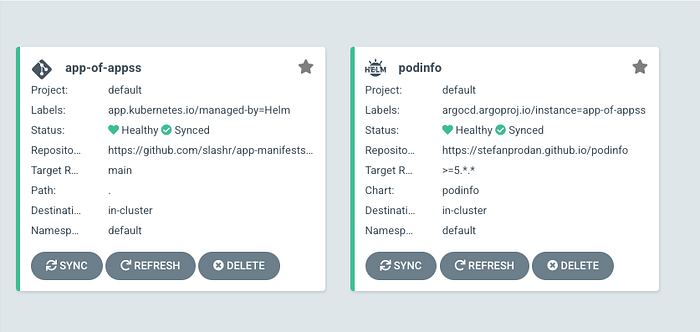
After applying the changes, you will see the app-of-apps on the ArgoCD homepage along with the Podinfo app. Success! We have deployed our first app using through ArgoCD.